How Can You Build an Effective ESD Workbench?
Are you worried about static electricity damaging your sensitive electronic components? This hidden danger can cause costly failures. Building a proper ESD workbench provides the necessary protection.
An ESD workbench is built using specific steps. You need proper grounding, dissipative work surfaces, and an integrated wrist strap system. Good ergonomic design and functional features are also key for safety and efficiency.
Building the right workspace is crucial in electronics handling. It's more than just a table; it's a protective system. Let's explore what goes into making a workbench truly ESD-safe and functional, drawing on my two decades in this field. Read on to understand the critical details.
What Exactly Is an ESD Workbench?
Confused about what an ESD workbench really does? Using a standard table for electronics work invites disaster. Understanding its purpose is the first step to protecting your valuable components.
An ESD (Electrostatic Discharge) workbench is specifically designed to safely channel static electricity away from sensitive items. It uses special materials and grounding techniques to prevent damaging discharges during electronic assembly or repair.
!
Diving Deeper into the Purpose
Why do we need this special type of bench? Modern electronic components are incredibly small and sensitive. Even a tiny amount of static electricity, often too small for a person to feel, can destroy them instantly or cause latent damage that leads to failure later on. I remember visiting a client years ago who couldn't figure out why their product failure rate was so high. It turned out their assembly area used standard tables, unknowingly damaging components before they even shipped. An ESD workbench prevents this by creating a controlled environment.
The Core Principle: Grounding
The main job of an ESD workbench is to provide a path to ground for static charges. Everything on and around the bench, including the surface, tools, and the operator, should be connected to a common ground point. This ground point safely drains away any static buildup. Think of it like a plumbing system for electricity; static charges flow harmlessly away instead of building up and causing a sudden, damaging spark (the electrostatic discharge or ESD event). Our workbenches are designed with integrated grounding points that comply with international standards like IEC61340-5-1, ensuring a reliable path to earth. This systematic approach is fundamental to effective ESD protection. It's not just about the benchtop; it's about the entire system working together.
What Makes an ESD Workbench Different from a Regular One?
Using regular tables or the wrong materials can build up static. This can lead to unexpected component damage. Choosing specific ESD-safe materials is essential for protection.
The key difference lies in the materials. ESD workbenches use dissipative surfaces that control static discharge rates safely. Regular benches often use insulative materials (static build-up) or conductive ones (too rapid discharge).

Material Properties Explained
Let's break down why the material choice is so critical. Materials fall into three main categories regarding static electricity:
| Material Type | Electrical Resistance (Ohms) | Static Behavior | Suitability for ESD Work Surface |
|---|---|---|---|
| Conductive | < 1 x 10⁴ | Allows rapid charge flow | No (Risk of rapid discharge) |
| Dissipative | 1 x 10⁴ to 1 x 10¹¹ | Allows controlled charge flow | Yes (Ideal for safe discharge) |
| Insulative | > 1 x 10¹¹ | Prevents charge flow; allows buildup | No (Risk of static buildup) |
As you can see, dissipative materials hit the sweet spot. They allow static electricity to flow away to ground, but slowly enough that it doesn't create a damaging spark. Conductive materials let the charge move too fast, which can be just as bad as a static zap for some sensitive components. Insulative materials, like standard plastic laminate or wood, don't allow charge to flow easily, meaning static can build up on the surface or on items placed on it, waiting to discharge dangerously.
Beyond the Work Surface
It's not just the main work surface that matters. In our factory, we ensure that other parts of the workbench system also support ESD safety. The frame might have an ESD-safe powder coat finish. Shelves, drawers, and other accessories that might come into contact with sensitive devices should also be made from dissipative materials or be properly grounded. For instance, our modular shelving uses the same quick-hang system as our other components and is designed with ESD safety in mind. This holistic approach ensures there are no 'hot spots' where static can build up unexpectedly. It's about creating a complete ESD protected area (EPA) centered around the workbench.
How Do I Build a Truly Functional ESD Workbench?
Putting together an ESD workbench might seem tricky. Missing just one critical element can compromise the entire setup. Follow these essential steps to ensure safety and functionality.
Build a functional ESD workbench with proper grounding, dissipative surfaces, and wrist strap connections. Also include ergonomic design, necessary features like storage and lighting, a sturdy structure, and ensure easy assembly.
Step-by-Step Breakdown for Functionality
Creating a truly effective ESD workbench involves several key considerations. Based on my experience designing and manufacturing these benches, here’s what I focus on:
Step 1: Ensure Professional Grounding
This is the foundation. The workbench must be correctly connected to the building's earth ground. This usually involves a common point ground connection, often including a 1-megohm resistor to prevent rapid discharge and protect personnel. All dissipative surfaces and connected personnel (via wrist straps) must lead to this common ground point. We ensure our benches have easily accessible, clearly marked grounding points compliant with IEC61340-5-1.
Step 2: Select the Right Materials
As discussed earlier, the work surface must be made of dissipative material. This provides the controlled path for static charges to drain away. Don't forget other surfaces like shelves or drawers where components might be placed. All materials in the immediate working area should ideally be dissipative or anti-static.
Step 3: Incorporate a Wrist Strap System
The operator is often the biggest source of static electricity. An anti-static wrist strap, connected via a coiled cord to the workbench's common ground point, is essential. This continuously drains any static charge the person might generate. Our workbenches always include convenient connection points for wrist straps.
Step 4: Focus on Ergonomic Design
Technicians often spend long hours at their benches. An ergonomic design reduces fatigue and improves productivity. Key features include adjustable height – we offer both manual crank and electric height adjustment options on our benches. Proper lighting, easy reach to tools and components, and comfortable positioning are vital. Good ergonomics also indirectly supports ESD safety by minimizing unnecessary movements that can generate static.
Step 5: Add Functional Features
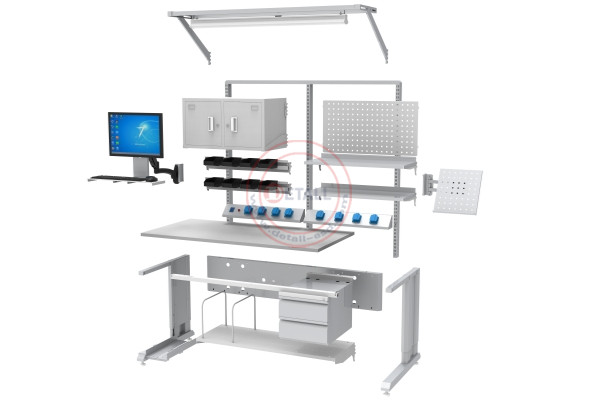
Think about the tasks performed: R&D, testing, assembly, repair. The workbench needs features to support these activities. This includes adequate space, power outlets, task lighting, and storage solutions. Our modular design excels here. We use a quick-hang system for components like shelves, drawers, tool holders, monitor arms, and bin rails. This allows users to quickly reconfigure the workbench for different tasks without complex tools.
Step 6: Demand a Robust Structure
The workbench needs to be stable and strong enough to hold potentially heavy equipment without wobbling or risk of collapse. We use heavy-duty steel frames to ensure durability and stability.
Step 7: Prioritize Quick and Simple Installation
Time is valuable. A workbench that is complicated or time-consuming to assemble is inefficient. Our modular components and quick-hang system make setup fast and straightforward, allowing users to get working sooner.
Here’s a quick summary table:
| Feature | Benefit | How We Address It |
|---|---|---|
| Grounding | Safely dissipates static | Integrated common ground points, IEC compliant |
| Dissipative Mats | Controls discharge rate | High-quality, tested dissipative surfaces |
| Wrist Strap | Grounds the operator | Convenient connection points |
| Ergonomics | Reduces fatigue, improves safety & productivity | Height adjustment (manual/electric), thoughtful layout |
| Modularity | Flexibility for different tasks | Quick-hang components (shelves, lights, tools, etc.) |
| Structure | Stability and durability | Robust steel frame construction |
| Easy Assembly | Saves time, reduces setup complexity | Modular design, simple connection methods |
By considering all these steps, you move beyond just having a table to creating a truly functional, safe, and efficient ESD protected workstation.
Conclusion
Building a proper ESD workbench requires specific materials, effective grounding, and user-focused design. Following these steps ensures a safe, ergonomic, and functional workspace for handling sensitive electronics.


